Fitness Drills for Football With a Ball – 5 Essential Ideas

Fitness training is crucial for any football team, but players often dread monotonous fitness routines. The solution? Integrate the ball into fitness drills. These engaging exercises not only blend football-specific movements with essential physical conditioning but also make training sessions enjoyable and engaging. This approach prepares your players for match-day intensity while keeping them excited about their progress. Here are five proven fitness drills for football with a ball, ideal for adult amateur teams.
Why Fitness Drills With a Ball Matter
Traditional fitness training—such as running laps, shuttle runs, or sprints—improves stamina but lacks football-specificity. By integrating a ball, fitness drills become immediately relevant, engaging, and match-realistic. Players not only build endurance and strength but also enhance technical skills, coordination, and decision-making under fatigue.
How to Implement Fitness Drills into Your Session
- Warm up: Start your session with a fun warm-up, such as our Tic Tac Toe Football Drill, before moving into these fitness circuits.
- Use intervals. Structure your drills to alternate between high-intensity bursts and short recovery phases to mimic match conditions.
- Combine ball work with fitness. Make sure every drill includes both a technical skill and a physical demand.
- Start simple, build up. Begin with easier progressions and gradually add speed, complexity, or resistance as your team improves.
- Track and adapt. Monitor performance closely and adjust drill durations, reps, or rest time to suit the group’s level and fatigue.
5 Football Fitness Drills With a Ball
These exercises utilise the ball to enhance stamina, decision-making, and technique simultaneously. Great for adult amateur teams training at an intensity.
- Drill 1 – Passing Circuit
- Drill 2 – Ball Control Circuit
- Drill 3 – One-Touch Short Passing
- Drill 4 – Throw-Ins
- Drill 5 – Headers and Throw-Ins
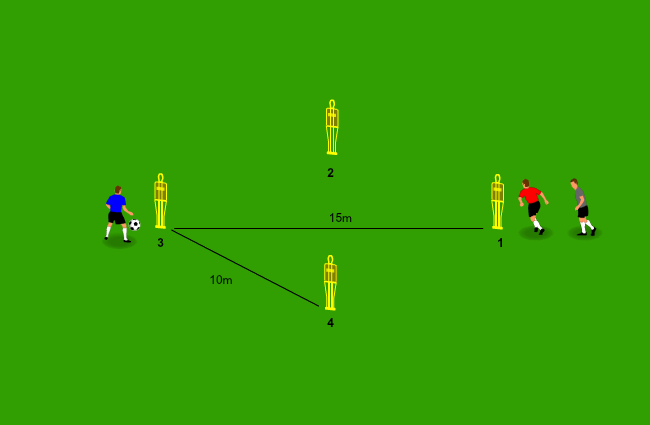
Drill 1 – Passing Circuit
Setup
- Create a diamond shape using 4 mannequins or poles.
- Each side of the diamond should be approximately 10 meters.
- The long diagonal (from mannequin 1 to 3) should be about 15 meters, and the other diagonal (4 to 2) about 13 meters.
- You’ll need 2 to 3 players per circuit, and one ball per group.
- Multiple groups can run in parallel if you have more players.
This drill is ideal for combining sprinting, agility, and one-touch passing. It also introduces movement coordination and communication between players.
Objective
To develop fitness through repeated sprints combined with ball control and one-touch passing in a continuous loop.
Progression
- The red player begins at mannequin 1 and sprints toward mannequin 2.
- The blue player, standing at mannequin 3 with a ball, passes to the outside of mannequin 2.
- The red player returns the pass in one touch and immediately curves their run toward mannequin 3.
- As the red player approaches, the blue player delivers a pass to the outside of mannequin 3. The red player again returns it in one touch.
- The blue player quickly plays a second pass to the inside of mannequin 3 (very short range). The red player returns this pass again in one touch.
- The red player continues sprinting toward mannequin 4, passing inside the diamond.
- The blue player serves another pass toward the outside of mannequin 4. The red player returns it and then sprints diagonally back to mannequin 1.
- As soon as the red player starts the final sprint, the next player (e.g. grey) at mannequin 1 begins their turn.
Repetitions
Each player completes 3 full laps before switching roles. In total, all players should complete 9 circuits each.
Coaching Tips
- Encourage clean one-touch passes and sharp changes of direction.
- Players should maintain intensity through every sprint.
- Correct foot positioning for receiving the ball while on the move.
Drill 2 - Ball Control Circuit
Setup
- Use 6 flat discs, rings, or ground markers (not cones).
- Arrange them into a zigzag formation forming two squares, each 10 meters wide.
- Place 3 balls on alternating markers (e.g. marker 1, 3, and 5).
- Groups should consist of 2–3 players maximum for intensity. Run multiple grids in parallel for larger squads.
This drill blends dribbling under pressure, acceleration, and directional changes, encouraging players to stay sharp and technically clean under fatigue.
Objective
Improve ball control, footwork, and short sprint conditioning using a zigzag dribble-sprint pattern.
Progression
- The red player starts at the first marker with a ball placed on it.
- They dribble at full speed from marker 1 to marker 2, stopping the ball neatly on top of the marker.
- They sprint without the ball diagonally to marker 3, where a second ball is positioned.
- The player takes that ball and dribbles it at full speed to marker 4, again stopping the ball on top of the marker.
- This pattern continues through markers 5 and 6, alternating between sprinting and dribbling.
- Once the player reaches the final marker (6), they reverse the sequence and return through the same markers — dribbling where a ball is placed and sprinting where there isn’t.
Repetitions
Each player completes 6 full laps (forward and back). Players can start as soon as the previous player finishes the first marker.
Coaching Tips
- Players must place the ball neatly on the disc, not just drop it.
- Reinforce clean dribbling mechanics — keep the ball close at speed.
- Watch for proper turning and sprint technique on direction changes.
For additional speed-focused ball control, see our Speed Dribbling Drill.
Drill 3 - One-Touch Short Passing
Setup
- 6 cones in a straight line, spaced evenly 1.5–2 meters apart, forming 5 small gates.
- Players form pairs and stand on opposite sides of the cone line (facing each other).
- Only 2 players are needed per group. If training a full team, create multiple lanes to run drills in parallel.
- Use 1 ball per pair.
This drill works as both a warm-up and a technical fitness exercise, training coordination, passing under fatigue, and fast footwork.
Objective
To develop short passing accuracy, timing, and ball control while continuously moving over short distances.
Progression
- The blue player starts by passing the ball through the first cone gate to the red player.
- The red player returns the ball through the next cone gate using one touch.
- Both players move forward together after each pass, progressing down the line while maintaining passing rhythm.
- Once they reach the final gate, they turn around and repeat the drill in reverse direction.
Repetitions
Run the drill continuously for 5 minutes or more. Encourage multiple sets with breaks or progressions.
Variations
- Start with unlimited touches to build rhythm, then reduce to two-touch, and finally to one-touch.
- Use weaker foot only for a round.
- Add mini hurdles or ladders on the side for returning players to increase aerobic demand.
Coaching Tips
- Insist on short, sharp one-touch passes using the instep.
- Focus on communication — players should call before passing or receiving.
- Keep knees slightly bent and body low when moving between gates.
Drill 4 – Throw-Ins
Setup
- Pair up players, ideally spaced 5 to 10 meters apart.
- One ball per pair.
- Space players evenly across the training area to allow safe throw-in repetitions without interference.
- No additional equipment required.
This drill targets upper-body strength, throw-in accuracy, and first-touch control. It simulates repeated throw-in exchanges with limited rest, increasing aerobic and muscular endurance.
Objective
Improve throw-in technique and build arm and core fitness, while also reinforcing quick, clean control of incoming balls.
Progression
- The first blue player performs a proper two-handed throw-in aimed at the second blue player’s feet.
- The receiving player stops the ball with one controlled touch.
- Once the ball is stationary, the receiver picks up the ball, resets, and throws it back using correct throw-in form.
- Players repeat the throw–receive–reset pattern continuously for 5 minutes or more.
Repetitions
- 5–10 minute continuous sets with role switching every 2–3 minutes.
- For a full squad, rotate partners after each set or run multiple rounds.
Coaching Tips
- Ensure players use legal throw-in mechanics: both feet on the ground, ball behind the head, full extension through the arms.
- Emphasize clean one-touch control using the sole or inside of the foot.
- Encourage a consistent rhythm to develop fitness through repetition.
Drill 5 – Headers and Throw-Ins
Setup
- Same as Drill 4: pairs of players spaced 5 to 10 meters apart.
- One ball per pair.
- No cones or additional equipment needed.
- Encourage groups to work in rhythm to avoid disruption between pairs.
This drill adds aerial control and timing to the throw-in routine. It emphasizes upper-body engagement, core control, and heading technique, all while maintaining light aerobic load.
Objective
To improve heading accuracy, throw-in variation, and ball control under fatigue, while encouraging constant motion and upper-body activity.
Progression
- The first blue player throws the ball to the second blue player at head or chest height.
- The receiving player performs a controlled header back to the thrower.
- The thrower stops the ball with a touch, resets it, and then performs a throw-in to the feet of the receiver.
- The receiver controls the ball again, then becomes the thrower, and the cycle repeats — alternating between headers and throw-ins.
Repetitions
- Work in 5-minute intervals, switching roles every 1–2 minutes.
- Run multiple sets if needed, or rotate pairs after each round.
Coaching Tips
- Teach players to keep their eyes open and neck firm when heading.
- Encourage using the forehead for contact, not the top or face.
- Throw-ins should remain technically sound, even under fatigue.
- Watch for body position when receiving throw-ins or setting up for a header.
Final Coaching Tips
- Insist on quality under fatigue. Players should execute every pass, touch, throw-in, or header with intent and technique—even when tired.
- Use timers or whistles for intensity. Audible signals help players maintain pace and stay engaged without losing focus.
- Encourage clear communication. Drills involving passing, rotation, or repetition flow better when players use verbal cues.
- Correct form early. Pay attention to posture in sprints, throw-in mechanics, and foot placement when receiving passes.
- Promote competition. Use time challenges, rep races, or partner duels to increase intensity and motivation.
Tracking Progress
- Monitor technical consistency. Observe how players handle the ball under fatigue—especially in their weaker foot or off-balance moments.
- Use heart-rate monitors or fitness trackers. These give you objective data on effort levels, recovery times, and workload tolerance.
- Log individual reps. Track how many circuits, touches, or headers each player completes in a drill over time.
- Introduce intensity benchmarks. Use markers like “X reps in 5 minutes” to give players a goal and measure improvement.
- Record video occasionally. Reviewing footage helps players see posture, footwork, and form in real scenarios.
Subscribe for More
Get more drills like these delivered directly to your inbox. Our free newsletter includes weekly training ideas, tactical guides, and occasional gear discounts.
👉 Subscribe to the Newsletter
Wrap-Up
Football fitness drills with a ball offer a powerful combination: they develop technical skills while building stamina, speed, and decision-making under pressure. These five exercises are ideal for adult amateur teams who want to get fit without sacrificing fun or realism in training.
Start small and build consistency. If you implement even two or three of these drills each week, you’ll begin to see noticeable improvements in your players’ conditioning and their on-ball confidence. As intensity increases, so will your team’s match-readiness and cohesion.
Engage with Us!
We’d love to hear how these drills worked for your team. Share your training footage or tag us on social media @footballtechniques.
Bonus: Watch a Professional Warm-Up
As a bonus, look at the conditioning circuit used by Atletico Madrid in the video below.
Related Posts
Block Movement Drill: 7v7 Game
A 7v7 block movement drill that helps adult amateur teams stay connected, move up together, and react quickly when possession changes.
Back Four Exit - Defenders vs Midfield and Attack
A Back Four Exit drill for adult amateur teams, training build-up play, pressing, switching play, transitions, and finishing in a zoned half-pitch setup.
Spatial Awareness Drill: Football with Rugby Rules
Train spacing, patience, support angles, and communication with a football drill that uses rugby-style offside rules and a controlled goal-line finish.